
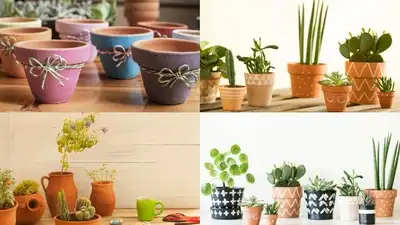
Here’s how to transform ordinary terracotta pots into something that looks like it belongs in a designer showroom.
The good news is that gap between “basic clay pot” and “boutique-store planter” is almost entirely down to a bit of paint, texture, and a few clever finishing touches, nothing that requires real artistic skill or an expensive shopping trip. There’s a very specific kind of sticker shock that comes with browsing a high-end garden or home decor store, watching a single planter cost more than an entire week’s grocery bill, all for a pot that, structurally, isn’t all that different from the plain terracotta ones stacked in a dusty corner of most homes. Here’s how to transform ordinary terracotta pots into something that looks like it belongs in a designer showroom. Start with proper prep and the right paint Every good transformation begins here, and skipping it is the single most common reason a paint job ends up peeling within weeks. Wipe the pot down with a damp cloth to remove dust, then apply a primer, ideally by spray, to give your paint a surface it’ll actually stick to properly. Since terracotta is naturally porous, look for paints designed to handle that, acrylic or outdoor acrylic for durability, chalk paint for a soft, matte, rustic finish, or enamel if you want a glossier, more polished look. A clay pot sealer brushed on afterward helps lock the design in and prevents moisture loss too. Try an elegant ombre or dip-dye effect Few techniques transform a plain pot as dramatically as a smooth colour gradient does. Starting with a base coat, gradually blend your chosen colour from full strength at the rim down to a soft, faded wash near the base, using a barely-damp brush to feather the transition so there’s no harsh line where the colours meet. It reads as genuinely expensive and considered, and works particularly well in a single bold colour like deep blue, terracotta orange, or blush pink for a soft, boutique-store finish. Add a scalloped rim for a vintage, high-end look
For an aged, “found at a countryside market” finish rather than freshly painted, lightly rub salt or baking soda into the wet paint before it fully dries, then brush it away once dry to reveal a softly distressed, weathered texture underneath. This one’s been genuinely trending for good reason, it transforms the entire silhouette of a plain pot with surprisingly little effort. After painting your base colour, line a scalloped, peel-and-stick trim around the rim using hot glue or a strong craft adhesive. Create an aged concrete-and-moss finish For anyone drawn to a more subdued, sophisticated look, this stippling technique mimics the appearance of aged concrete beautifully. After your base coat dries, dip just the tips of a chip brush lightly into a second, contrasting colour and dab it on in small, controlled patches using an up-and-down motion rather than brushing back and forth, avoiding full coverage. For an extra layer of realism, repeat the same stippling technique in a muted green in a few spots, mimicking the gentle moss growth you’d see on a genuinely old, weathered pot. Go bold with colour-blocking and simple patterns If a full paint job feels like too much commitment, taping off clean, geometric sections of the pot and painting each in a different colour creates a striking, modern look with minimal effort. For something a bit more playful, dip the wrong end of a small paintbrush into paint to stamp neat, evenly spaced polka dots across the surface, a genuinely simple technique that reads as far more intentional and designer than the five minutes it actually takes. Decoupage for an instantly patterned finish For a completely different aesthetic, decoupage lets you skip freehand painting altogether while still achieving a genuinely custom look. Cut patterned paper, fabric scraps, or even wallpaper offcuts to fit sections of the pot, then adhere them using a decoupage glue or diluted white glue, smoothing out any air bubbles as you go, and finish with a clear sealant once fully dry. It’s a particularly good option if you want an intricate, patterned finish without needing a steady painting hand. Disclaimer: This article is intended for general informational purposes only. Work in a well-ventilated area when using spray paint, primer, or sealant, and allow adequate drying time between coats as per product instructions. For pots intended for outdoor use, choose weather-resistant paint and sealant specifically designed for outdoor conditions to ensure the finish lasts. Looking for trusted parenting advice? Follow TOI Parenting Circle on Instagram for expert guidance, relatable stories, and practical tips delivered every day.