
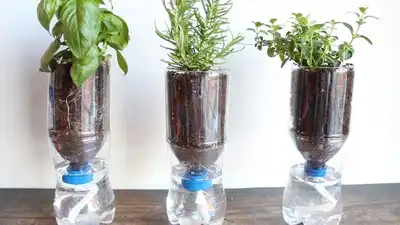
Turn an old plastic bottle into a self-watering planter at home with this simple DIY that keeps your plants hydrated
Preparing the plastic bottle is also very important. Wash and dry the bottle before doing anything else. Cut the plastic bottle in half Cut the plastic bottle roughly in half to get two parts of it. It does not have to be in the middle but just leave enough space at the bottom to hold water and also room at the top to grow your plants. Make a water-wicking hole in the cap Make a hole in the cap and tie a piece of cotton cord or a thick string. The thread should be thick enough to hold water. Make sure to leave enough of it on both sides. Screw the cap back on the bottle. The principle is similar to a regular self-watering pot. The cotton cord serves as a wick that transports water from the bottom reservoir up to the plant’s roots. Assemble the self-watering planter Take the top of the plastic bottle and insert it into the second part of the bottle. Make sure that the wick is facing the water reservoir. Add the potting soil to the top part of the plastic bottle. Make sure to fill it up to the wick. Do not make the soil compactedto provide ample space for the roots. Plant your desired plants on the planter.
If you have an empty plastic bottle lying around at home, don’t throw it away just yet. With a few simple steps, you can turn it into a small self-watering planter for herbs, flowers or other small plants. Make a miniature self-watering planter out of a plastic bottle. This is a quick and easy DIY for repurposing a plastic bottle that will come in handy for growing herbs or flowers indoors. A self-watering planter is the easiest way to grow plants if you are not the most enthusiastic about taking care of them. It helps to keep the soil constantly moist without having to water the plants directly. Materials to use: A plastic bottle Sharp scissors or a cutter Potting soil Cotton or a thick string Water Herbs, flower seeds or any other plants that you want to grow Instructions Fill the water tank and choose the appropriate location for your planter. The wick must be wet but not submerged in water. Put the planter where it can get the required amount of sunlight depending on what you will grow there. Self-watering planters need little care but remember to keep an eye on the water level and the condition of the soil. An effective and fast DIY project The planter from a plastic bottle is an excellent example of recycling and minimizing the use of plastic. It also looks charming on a windowsill or a balcony. However, even though the self-watering planter takes care of most of the plant needs, you should still check the condition of the roots and the soil occasionally and ensure that the plant is not sitting in too much water. DIY: Have an empty wall? This no-drill home décor hack can transform your space in just an afternoon Watch out for the plant Even though the wick is responsible for most of the water delivery, regular observation is still recommended. If the soil in the planter always seems moist and the plant looks sick, then you need to reduce the amount of water and let the soil get dry a little bit. Plants have various moisture requirements and some observation will help you understand how to balance the things. Personalize your new planter There is also room for personalization here. You can paint the outside of the bottle, tie it with jute, or add some simple patterns. If you decide to make several such planters, then you can use different bottles for different herbs and label them. It is an easy project that can turn waste into a small indoor garden. Looking for trusted parenting advice? Follow TOI Parenting Circle on Instagram for expert guidance, relatable stories, and practical tips delivered every day.